Just wanted to let everyone know there is a new Single Wing Forum that has opened up here recently, by Coach Tut. It's Pro Board based so it seems much friendlier than some of the other forums out there. Go to the site, check it out and start sharing some of you Single Wing knowledge (I need it!).
In other news and links:
Coach Hoover's site has got some great running back drills. This link takes you to them all. If you are a running back's coach, I highly recommend checking out Coach Hoover's site and utilizing the drills he has out there. Good stuff coach!
Compete in all things has two really good posts on the 3-4 defense. The first one is one on a very good safety blitz from the 3-4 called Sabre. This blitz can be run from anywhere on the field, and really puts the offense in a bind. Secondly, the post of defensive line play in the 3-4 is brief, but descriptive. It's hard enough to find information on the 3-4, and even harder yet to find information on defensive line play in that defense. Take a look at Coach Mariner's site, it's loaded with information!
Brophy is at it again with gun running. His posts on the subject have been very informative for those that are shotgun guys and looking to improve their run game. As usual Brophy follows up his postings with some of the best video on any football blog I've seen.
Well, that's what I've been reading, hit me up in the comments section and share any other football blogs you read. Those of you in the playoffs, congratulations, now's the time to make it count. Don't waste a minute of it, and enjoy it while you're there!
After our first installment on the B back, we now know what we need for the position, but we now need to give him a job description. I do this with all positions whether offense, defense, or special teams. So, what is the B back's job description? Well, the B back's main role in the offense is the dive back on the triple option. A typical fullback is usually not utilized as a runner, and you will find that blocking is not a top priority of the Flexbone B back. Being able to run option plays such as midline, inside veer (ISV) and outside veer (OSV) are essential (again this goes back to the first post on what we are looking for in our B back). The B back is not a "driller" either, he must be able to cut back and make quick cuts on the zone dive play. I have also utilized the B back as an outside runner on option plays as well. Lastly the B back does need to block some. He will be called on a lot in pass protection as he makes up the 6th in our 6 man protection schemes. He's also the C gap blocker on sprintout passes as well. The B back, for me, has also needed the ability to catch passes as I run the waggle off the Rocket toss play as well as middle and off tackle screens to the B back. As you can see, the B back in the Flexbone must be a pretty versatile player. Let's look closer and some of the common run plays the B back is involved in, and also plays used to keep the B back involved in the game.
Option Runs The B back is involved in several of the Flexbone option runs. These include the following, midline, ISV, OSV and speed option. For those that run trap and trap option, the B back is obviously a part of this as well.
Inside Veer/Triple Option The B back is the crux of the triple option. He is the man that you must get established to make it all go. The defense must honor the give to the B back. Listen to any good circle of defensive coaches, and you will hear the phrase "You must take away the dive". Nobody wants to get beat by a running back (RB) pounding it up the middle on you all night, well, this is EXACTLY what the B back is for. Quickness and toughness are essential to any B back if they are going to helm make the best play in football go!
Midline Midline, is my favorite play in all of football. I don't believe there is another play out there that hits with the quickness of the midline out of the Flexbone offense. This is where the B back's quickness comes into play. Toughness is also shown here, as the B back will be running right into the teeth of the defense.
Outside Veer Though not a staple of many Flexbone offenses, the OSV is one the B back must be able to run. With the modern day twist on defense switching back to that of the odd front, the need is there for a TE flank and the ability to run OSV putting the defense in conflict. The B back's role on OSV compared to ISV is no different, especially the way I run it (for a later post, email me to discuss if you'd like). Nonetheless, the B back still has to utilize his strength and quickness when running the OSV, just as he does with midline and the ISV.
Speed Option Johnathan Dwyer at Georgia Tech made a living on the speed option, due in part to him being such a fantastic athlete. If you've watched Paul Johnson's teams as long as I have, you know the speed option is a great play, when your B back is a home run hitter. A few years back I had a B back that could fly, he was small but super explosive and ran the ball well inside or out. I dusted of the speed option, to a tune of a 7.7 yard per average carry on that single play alone and 9 touchdowns that year. Our QB was a good runner too, so it was truly a double option threat! If your B back is more of a straight-ahead power runner, then the speed option might not be for you. However, if you think your B back would do good out on the edge of the defense, I suggest you run this complimentary play.
Complimentary Plays Any good defense is going to take away the B back at some point during the season. Having complimentary plays is what keeps the B back involved in the run game, and a viable threat when running the triple option. I'm going to list some plays you can use to help keep the B back involved in the run game when the defense is taking him out of the triple option equation.
Zone Dive The zone dive is the play that is designed to keep the B back involved in the run game when the defense has done a good job of taking away the dive portion of the triple option. Very simply put, the zone dive is the Flexbone's inside zone play. There is no read, and all the OL zone block, including the PSSB. The BSSB goes in motion just like the regular triple option play and runs his normal pitch course. The B back will take a flat step, instead of a straight ahead attack step as he does on the triple option. This is so the B back can get a good read on the playside guard's (PSG's) block. Once this "read step" has been made the B back squares his shoulders and either stays on track or cuts back, but must NEVER bounce to the outside. The QB will bring the ball back as deep as he can so the ball is in the B back's hands as long as possible to help with the B back's read on the defense. This also helps with the illusion of the play being the standard triple option play. Once the QB disconnects with the B back, he then carries out his option fake.
Iso Iso is a play I got from the University of the Cumberlands staff about three years ago. It is zone dive, and OSV wrapped into one package for them. They have used it with great success in recent years, and I took it and completely removed the Zone Dive from my playbook. Iso blocking was something my players know from running the counter-iso play. So, there was no new teaching for anybody on the offense. The only new teaching came from the footwork of the B back, and the QB not having to read anyone. The QB delivers the ball as deep as he can to the B back, the exact same way the zone dive is run. Once the ball is seated, then the QB and backside slot (BSSB) carry out their option fake. The playside slot (PSSB) folds underneath and blocks first LB to the playside. The OL is iso blocking to the playside and scooping to the backside. The only difference from ISV to the Iso play is the first step of the B back. Instead of attacking downhill, the B back will take a lateral step, and then attack the outside hip of the playside guard (PSG). This allows the B back to read the blocks and be prepared to make a cut quickly, just as the Zone Dive does, but without having to teach zone blocking. This is a very good play, and I recommend that you add it to your playbook...TODAY!!!!
Trap I've never been a big proponent of trap or trap option, however it is a part of many Flexbone schemes. My guards have always been the large immovable objects on my OL, and not usually known for pulling well, so I've strayed away from running trap or trap option. If you have the guards to do so, and you run a lot of midline, I suggest adding the trap in, especially if you are facing a hard to read three technique. The trap puts a "squatting" or "sitting" three technique in conflict as with the trap block it automatically declares the tackle to be a B gap player. Again, if you've got the guards, and you run a lot of midline, I suggest adding trap to your repertoire.
Draw A great play off sprintout action is the sprint draw. In years where my B back was more of a rushing threat than my QB, I have used this very play. It's very successful, and can really crease the defense if you are good at sprintout passing from the Flexbone. The B back sets up as if to block on the play, but then quickly slashes back running to daylight. I have seen huge gains off this play from both the B back and the QB. Even though it's not known as a passing offense, a good draw play is a must in any playbook.
There are many other ways to keep the ball in the hands of the B back, you can use screens and quick passes to him coming out of the backfield. The plays listed above are ones you can use to keep your play maker involved in the game, even though the defense is taking him away from the bread and butter option plays. You can also use the complimentary plays to hurt over-aggressive defenses who are being unsound against your option plays. This ability to keep the defense honest, will allow you to run your base triple option plays successfully.
I certainly hope you enjoyed the installment on one of the key elements to any Flexbone triple option attack...the B back!
Ok, so you've got your B back's, now how to teach them to do what you need them to do...get off the ball quick and run to daylight based on quick reads. So how to do this? It's not complicated, but like anything in football, you must start off with good fundamentals, or the rest of the teaching will be flawed.
Alignment The B back aligns directly behind the QB with his down hand approximately six feet from the heels of the QB. I use this rule, because it's a shorter distance to estimate for the B back. A lot of coaches say put the heels of the B back at five yards from the tip of the ball, I'd rather use the hand method as all of this is "seen" by the B back. The key element here is that the mesh happens FAST. The QB cannot be waiting on the B back in the mesh, or "bubbling" around the QB in the mesh, as this causes problems with the pitch phase of the triple option.
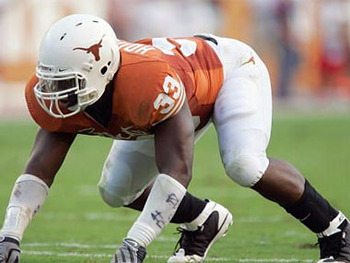
Stance The stance of the B back is the critical part of being able to utilize your players assets you found utilizing the drills we talked about in an earlier post. The stance of the B back is typical to that of a defensive end in a four man front. To start, the B back has his feet shoulder width or even slightly narrower. They can drop their off foot back as well if need be. Now, I've even had them get in a four-point stance if they felt more comfortable doing so. Not what I'd do every time, but there are times when a B back wants to "pop" up out of his stance rather than exploding forward that going to the four-point will help this. Anyhow, once the feet are where you want them, have the player rock forward and put a large majority of his weight on his down hand The buttocks should be higher than the head and the back is straight. Due to arm length, some kids buttocks will not be above their heads, it will be parallel with it, and this is ok. What you don't want is a kid that has his buttocks below his head as this will make him "pop" up, or become what I always labeled a "Jack in the Box". Anyhow, you have just effectively taught the prototypical B back stance!
Start The start is very important to the B back, just like any other position in football. The B back will use a short six inch power step on the snap, stepping in the direction of the play. During this step the shoulders will slightly elevate, but hey should not come straight up. Once the first step is in the ground, the second step will be utilized to gain ground toward the point of attack. I always used the middle of the guard as the aiming point on the inside veer (ISV), so that was where we were pointed once the second step was in the ground. Sometimes you had to correct B backs that were going forward and on the second step changing direction to get in the mesh. This is not good as the QB can bump into or connect too early with the B back, thereby making the play not as effective. The B back and QB should mesh as seamlessly as possible.
In the Mesh Once the B back is in the mesh, or if you are a no mesh team, once he's on his veer path, the B back's pads should remain low, rising no more than 12 inches or so from their original position. The B back makes the traditional pocket that running back's (RB's) do with his inside arm up. In a ride and decide system, the B back will feel the QB seat the ball in his belly. He MUST NOT clamp down at this point, however as the QB is still in the process of making his dive read. Once the B back feels the QB apply pressure to the B back's abdomen (this means the QB has straightened his arm and has stopped the riding process), the B back must clamp down on the football. In the milliseconds while the read is happening the B back should be reading the guard's block to his side, especially if running the ISV to a three technique. This allows the B back to cut or run to daylight when the QB gives the football. Once the football is secure, the B back then makes his cut and gets in what I call the "crease".
If you are a no mesh, or Point Method guy, the B back, while on his crease path, makes his normal pocket for the QB. Once he feels the football, he clamps down on it immediately as he knows if the QB leaves the ball out there, by the time the B back gets the football, it's his. The same reads apply for the B back in that he should be reading the guard's block as to where to cut to once he has the football given to him.
In both mesh and no mesh systems, if the QB does not give the ball, the B back should be in a great position to absorb the hit coming from the handoff key (HOK). The back should look to take this tackle on low and hard, and even step into the tackle if possible. This will keep the HOK occupied so he cannot slip off and play both the QB and the B back. The B back should keep his arms in front of him, as though he got the handoff and should barrel ahead into the tackle. If the QB misreads the play, the B back should run through the crease and look for the first opposite colored jersey he sees and block it.
Running with the Football Once the ball is given, the B back is not a prototypical runner at this point. He must make his cut and stick with his decision. "Dancers" are not allowed at the B back position. These guys must be able to make a quick cut and go. This is less imperative if you do not run ISV at a three technique as more than likely, the B back will be able to stay on track, and run the crease. One effective technique on both ISV and midline is to have the B back "bend" back in behind the HOK, as there is a natural void there due to the HOK not squeezing down to take the B back.
Please...no dancers...
The B back should keep two hands on the football at all times when in traffic. If he breaks out, then he can tuck the ball away with one hand. This is important as the B back's first five to ten yards are going to be in the belly of the defense where there are plenty of opportunities to get hit and fumble the football. Another coaching point is the B back NEVER looks back! If he feels the QB pull the ball and knows it was a fumble, he must keep running. This does two things, it gets a body out of the way so the QB can find and jump on the football, and it looks, to the HOK, like the B back still has the football. This part is sometimes easier said than done, but by explaining to your B back's they are like a missile on every play, they should get the idea that they are to not look back once they take off.
Problems and Coaching Points
Mesh is too slow/QB bubbling off mesh- Move the B back up closer to the QB. Too close and you don't have a good mesh angle. If you have to move the B back more than a foot, he should be playing offensive tackle.
Mesh too quick, QB not getting a good read- While I argue this is a moot point and your QB should learn to read it quicker, you can back the B back up a bit, but again, one foot is the mark. If moving him back doesn't work, find you a new QB.
B back bending into the mesh- This happens a lot with younger, more inexperienced players for some reason. Look at the B back's feet and make sure he's stepping with his playside foot first in the direction of the aiming point. Sometimes younger players rely on their dominant hand or foot and you will find that they tend to run the play good in one direction but not the other. If this is the case, rep your back doing it do his weak side twice as much to his strong side.
Ball being placed too low on B back's body- This comes from your B back running upright. One good place to rep your B back's are in the linemen chutes (if you have them). This teaches them to come out low and hard, with the best application being a "battleground chute".
Fumbles in the mesh- This problem can go two ways, as it could be your QB. The first thing to look at is, does the B back seem to be pulling or tugging at the ball in the mesh. If so, he's not understanding what he's supposed to be feeling. Mesh drill is a good way to work on this, but slow it down if having problems. Let the B back know it's going to be a give or a pull and have the QB follow your instructions so they can both feel how each is supposed to feel.
B back off track- This happens quite a bit, even when utilizing a fire hose for your linemen splits. The best thing is to build a "Mesh Board" as I call it. It's two pressure treated 2x6's made in a V. They are attached at the V with a bolt, two washers and a wing nut (for easy removal and storage). About midway up is a piece of chain, measured to the right length to accommodate your linemen's splits. These boards are only four feet long and when laid on the ground form a "V". The B back places his hand in the middle of the V (see mesh drill video above) and runs along the board to stay on course.
B back stops on contact- There are going to be misreads, or even close reads where the B back is going to get hit or partly hit by the HOK. If the B back is stopping on contact, work the gauntlet drill continuously or work the veer drill with an offensive tackle and defensive linemen to simulate "live" situations. This may also be the player, and you may need to reevaluate whether or not this player is suited to play B back.
The B back's initial alignment, stance and get off are imperative to the success of the triple option in the Flexbone offense. Do not leave these details alone, and "hope" they will get coached. If you see problems arising, work on them immediately as the success of your offense hangs in the balance!
For the next installment, I will discuss the B back and his role in the running game in the Flexbone offense.
Ok, so you've got your B back's, now how to teach them to do what you need them to do...get off the ball quick and run to daylight based on quick reads. So how to do this? It's not complicated, but like anything in football, you must start off with good fundamentals, or the rest of the teaching will be flawed.
Alignment The B back aligns directly behind the QB with his down hand approximately six feet from the heels of the QB. I use this rule, because it's a shorter distance to estimate for the B back. A lot of coaches say put the heels of the B back at five yards from the tip of the ball, I'd rather use the hand method as all of this is "seen" by the B back. The key element here is that the mesh happens FAST. The QB cannot be waiting on the B back in the mesh, or "bubbling" around the QB in the mesh, as this causes problems with the pitch phase of the triple option.
Stance The stance of the B back is the critical part of being able to utilize your players assets you found utilizing the drills we talked about in an earlier post. The stance of the B back is typical to that of a defensive end in a four man front. To start, the B back has his feet shoulder width or even slightly narrower. They can drop their off foot back as well if need be. Now, I've even had them get in a four-point stance if they felt more comfortable doing so. Not what I'd do every time, but there are times when a B back wants to "pop" up out of his stance rather than exploding forward that going to the four-point will help this. Anyhow, once the feet are where you want them, have the player rock forward and put a large majority of his weight on his down hand The buttocks should be higher than the head and the back is straight. Due to arm length, some kids buttocks will not be above their heads, it will be parallel with it, and this is ok. What you don't want is a kid that has his buttocks below his head as this will make him "pop" up, or become what I always labeled a "Jack in the Box". Anyhow, you have just effectively taught the prototypical B back stance!
Start The start is very important to the B back, just like any other position in football. The B back will use a short six inch power step on the snap, stepping in the direction of the play. During this step the shoulders will slightly elevate, but hey should not come straight up. Once the first step is in the ground, the second step will be utilized to gain ground toward the point of attack. I always used the middle of the guard as the aiming point on the inside veer (ISV), so that was where we were pointed once the second step was in the ground. Sometimes you had to correct B backs that were going forward and on the second step changing direction to get in the mesh. This is not good as the QB can bump into or connect too early with the B back, thereby making the play not as effective. The B back and QB should mesh as seamlessly as possible.
In the Mesh Once the B back is in the mesh, or if you are a no mesh team, once he's on his veer path, the B back's pads should remain low, rising no more than 12 inches or so from their original position. The B back makes the traditional pocket that running back's (RB's) do with his inside arm up. In a ride and decide system, the B back will feel the QB seat the ball in his belly. He MUST NOT clamp down at this point, however as the QB is still in the process of making his dive read. Once the B back feels the QB apply pressure to the B back's abdomen (this means the QB has straightened his arm and has stopped the riding process), the B back must clamp down on the football. In the milliseconds while the read is happening the B back should be reading the guard's block to his side, especially if running the ISV to a three technique. This allows the B back to cut or run to daylight when the QB gives the football. Once the football is secure, the B back then makes his cut and gets in what I call the "crease".
If you are a no mesh, or Point Method guy, the B back, while on his crease path, makes his normal pocket for the QB. Once he feels the football, he clamps down on it immediately as he knows if the QB leaves the ball out there, by the time the B back gets the football, it's his. The same reads apply for the B back in that he should be reading the guard's block as to where to cut to once he has the football given to him.
In both mesh and no mesh systems, if the QB does not give the ball, the B back should be in a great position to absorb the hit coming from the handoff key (HOK). The back should look to take this tackle on low and hard, and even step into the tackle if possible. This will keep the HOK occupied so he cannot slip off and play both the QB and the B back. The B back should keep his arms in front of him, as though he got the handoff and should barrel ahead into the tackle. If the QB misreads the play, the B back should run through the crease and look for the first opposite colored jersey he sees and block it.
Running with the Football Once the ball is given, the B back is not a prototypical runner at this point. He must make his cut and stick with his decision. "Dancers" are not allowed at the B back position. These guys must be able to make a quick cut and go. This is less imperative if you do not run ISV at a three technique as more than likely, the B back will be able to stay on track, and run the crease. One effective technique on both ISV and midline is to have the B back "bend" back in behind the HOK, as there is a natural void there due to the HOK not squeezing down to take the B back.
Please...no dancers...
The B back should keep two hands on the football at all times when in traffic. If he breaks out, then he can tuck the ball away with one hand. This is important as the B back's first five to ten yards are going to be in the belly of the defense where there are plenty of opportunities to get hit and fumble the football. Another coaching point is the B back NEVER looks back! If he feels the QB pull the ball and knows it was a fumble, he must keep running. This does two things, it gets a body out of the way so the QB can find and jump on the football, and it looks, to the HOK, like the B back still has the football. This part is sometimes easier said than done, but by explaining to your B back's they are like a missile on every play, they should get the idea that they are to not look back once they take off.
Problems and Coaching Points
Mesh is too slow/QB bubbling off mesh- Move the B back up closer to the QB. Too close and you don't have a good mesh angle. If you have to move the B back more than a foot, he should be playing offensive tackle.
Mesh too quick, QB not getting a good read- While I argue this is a moot point and your QB should learn to read it quicker, you can back the B back up a bit, but again, one foot is the mark. If moving him back doesn't work, find you a new QB.
B back bending into the mesh- This happens a lot with younger, more inexperienced players for some reason. Look at the B back's feet and make sure he's stepping with his playside foot first in the direction of the aiming point. Sometimes younger players rely on their dominant hand or foot and you will find that they tend to run the play good in one direction but not the other. If this is the case, rep your back doing it do his weak side twice as much to his strong side.
Ball being placed too low on B back's body- This comes from your B back running upright. One good place to rep your B back's are in the linemen chutes (if you have them). This teaches them to come out low and hard, with the best application being a "battleground chute".
Fumbles in the mesh- This problem can go two ways, as it could be your QB. The first thing to look at is, does the B back seem to be pulling or tugging at the ball in the mesh. If so, he's not understanding what he's supposed to be feeling. Mesh drill is a good way to work on this, but slow it down if having problems. Let the B back know it's going to be a give or a pull and have the QB follow your instructions so they can both feel how each is supposed to feel.
B back off track- This happens quite a bit, even when utilizing a fire hose for your linemen splits. The best thing is to build a "Mesh Board" as I call it. It's two pressure treated 2x6's made in a V. They are attached at the V with a bolt, two washers and a wing nut (for easy removal and storage). About midway up is a piece of chain, measured to the right length to accommodate your linemen's splits. These boards are only four feet long and when laid on the ground form a "V". The B back places his hand in the middle of the V (see mesh drill video above) and runs along the board to stay on course.
B back stops on contact- There are going to be misreads, or even close reads where the B back is going to get hit or partly hit by the HOK. If the B back is stopping on contact, work the gauntlet drill continuously or work the veer drill with an offensive tackle and defensive linemen to simulate "live" situations. This may also be the player, and you may need to reevaluate whether or not this player is suited to play B back.
The B back's initial alignment, stance and get off are imperative to the success of the triple option in the Flexbone offense. Do not leave these details alone, and "hope" they will get coached. If you see problems arising, work on them immediately as the success of your offense hangs in the balance!
For the next installment, I will discuss the B back and his role in the running game in the Flexbone offense.